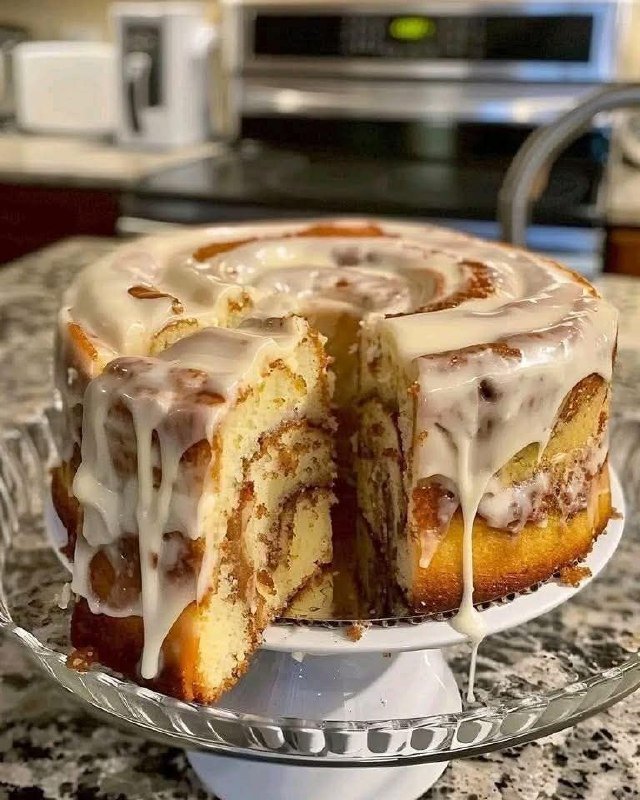
Simple but always felt like a special
Instructions
- Activate the Yeast: In a large bowl, combine the warm milk, 1 teaspoon of granulated sugar, and yeast. Stir gently and let sit for 5-10 minutes until foamy. This indicates the yeast is active.
- Prepare the Dough: To the foamy yeast mixture, add the remaining ¼ cup granulated sugar, egg, melted butter, and salt. Whisk until well combined. Gradually add the flour, 1 cup at a time, mixing with a wooden spoon or a stand mixer with a dough hook attachment until a shaggy dough forms.
- Knead the Dough: Turn the dough out onto a lightly floured surface and knead for 5-7 minutes, or use a stand mixer with a dough hook for 3-5 minutes, until the dough is smooth and elastic. It should be slightly tacky but not sticky.
- First Rise: Lightly grease a clean large bowl. Place the dough in the bowl, turning once to coat. Cover the bowl with plastic wrap or a clean kitchen towel and let it rise in a warm place for 1-1.5 hours, or until doubled in size.
- Prepare Baking Pan: While the dough is rising, grease and flour a 9-inch round cake pan or a 9×9 inch square baking pan. You can also line the bottom with parchment paper for easier removal.
- Make the Cinnamon Swirl Filling: In a medium bowl, combine the softened butter, brown sugar, and ground cinnamon. Mix with a fork or spatula until well combined and a spreadable paste forms.
- Roll Out the Dough: Once the dough has doubled, gently punch it down to release the air. Turn the dough out onto a lightly floured surface. Using a rolling pin, roll the dough into a large rectangle, approximately 18×12 inches (45×30 cm). Aim for an even thickness.
- Spread the Filling: Evenly spread the cinnamon swirl filling over the entire surface of the dough, leaving a small ½-inch border along one of the long edges.
- Roll the Dough: Starting from the opposite long edge (the one with the filling spread all the way to the edge), carefully and tightly roll the dough into a log. Pinch the seam closed to seal it.
- Slice the Rolls: Using a sharp knife or unflavored dental floss, cut the log into 8-9 equal slices, about 2 inches thick.
- Arrange in Pan: Arrange the cinnamon roll slices in the prepared cake pan, leaving a little space between them as they will expand. They don’t need to be perfectly snug.
- Second Rise: Cover the cake pan loosely with plastic wrap or a clean kitchen towel and let it rise in a warm place for another 30-45 minutes, or until the rolls look puffy and nearly doubled in size.
- Preheat Oven: While the rolls are on their second rise, preheat your oven to 375°F (190°C).
- Bake the Cake: Bake for 30-40 minutes, or until the top is golden brown and the rolls are cooked through. If the top starts to brown too quickly, you can loosely tent it with aluminum foil.
- Cool Slightly: Once baked, remove the cake from the oven and let it cool in the pan on a wire rack for about 10-15 minutes.
- Make the Cream Cheese Glaze: While the cake is cooling, prepare the glaze. In a medium bowl, beat the softened cream cheese and butter together with an electric mixer until smooth and creamy. Gradually add the sifted powdered sugar, beating until smooth. Stir in the vanilla extract. Add milk or cream one tablespoon at a time until you reach your desired drizzly consistency.
- Glaze the Cake: While the cake is still warm (but not hot), generously drizzle the cream cheese glaze over the entire cake, allowing it to melt slightly and seep into the crevices.
- Serve: Serve warm and enjoy!
Cooking Tips and Variations
Achieving that “special” feeling with your Cinnamon Roll Cake largely comes down to a few key techniques and considerations. First and foremost, the temperature of your ingredients is crucial. Ensure your milk is warm, not hot, to activate the yeast without killing it, and that your egg and butter are at room temperature. This allows for a smoother, more cohesive dough and a better rise. When kneading the dough, don’t be tempted to add too much extra flour, even if it feels a bit sticky. A slightly tacky dough will result in a more tender and moist crumb. Over-flouring can lead to a dry, dense cake.
For the cinnamon swirl, make sure your butter is truly softened, not melted. This allows it to mix easily with the brown sugar and cinnamon to form a spreadable paste that won’t leak out during baking. Don’t skimp on the filling; a generous layer is what gives this cake its signature flavor and beautiful swirl. When rolling the dough, strive for an even thickness. This ensures that all parts of your cake bake consistently. Roll it tightly to prevent gaps in the swirl, but not so tight that it tears the dough.
Proofing is another critical step. A warm, draft-free environment is ideal for both rises. If your kitchen is cool, you can place the covered bowl or pan in a slightly warm (but turned off) oven, or near a warm window. The second rise allows the individual rolls to puff up and meld together, creating that cohesive cake structure. For a beautifully golden-brown top without overbaking, keep an eye on your oven. If it’s browning too quickly, a loose tent of aluminum foil can save the day.
Want to experiment with variations? Consider adding a handful of chopped pecans or walnuts to the cinnamon swirl mixture for a delightful crunch. A touch of orange zest in the dough or glaze can add a bright, citrusy note that complements the cinnamon beautifully. For an even richer glaze, try using heavy cream instead of milk. You could also make a maple cream cheese glaze by substituting some of the milk with maple syrup. For a less sweet option, reduce the powdered sugar in the glaze slightly, or omit the glaze entirely for a more rustic, bread-like experience. This recipe is also adaptable to different pan sizes; a 9×13 inch rectangular pan would create a flatter, pull-apart style cake, perfect for sharing.
Storage and Reheating
To keep your Cinnamon Roll Cake tasting its best, proper storage is key. Once the cake has cooled completely and the glaze has set, cover it tightly with plastic wrap or transfer it to an airtight container. At room temperature, it will stay fresh and delicious for up to 2-3 days. If you live in a warm or humid climate, or if you prefer to extend its shelf life, you can store it in the refrigerator for up to 5 days. Just be aware that refrigeration can sometimes alter the texture of baked goods, making them a little denser.
When it comes to reheating, you definitely want to enjoy this cake warm, as that’s when its flavors truly shine and the dough is at its softest. If you’re reheating individual slices, the microwave is your best friend. Place a slice on a microwave-safe plate and heat for 15-30 seconds, or until warmed through. Be careful not to overheat, as this can make the cake tough. For larger portions or if you’re reheating the entire cake, the oven is an excellent option. Preheat your oven to 300°F (150°C). Cover the cake loosely with aluminum foil to prevent the glaze from burning or drying out, and heat for 10-15 minutes, or until warmed through. The foil helps to trap moisture, keeping the cake tender. Avoid reheating multiple times; it’s best to warm only what you plan to eat.
Frequently Asked Questions
Can I prepare the dough ahead of time?
Yes, you absolutely can! To prepare the dough ahead, after the first rise, punch down the dough, form it into a ball, and place it in a lightly oiled bowl. Cover tightly with plastic wrap and refrigerate for up to 24 hours. When you’re ready to bake, remove the dough from the refrigerator, let it sit at room temperature for about 30-60 minutes to take off the chill, then proceed with rolling, filling, slicing, and the second rise as directed in the recipe.
My cinnamon roll cake didn’t rise. What went wrong?
The most common reasons for a dough not rising are inactive yeast or incorrect liquid temperature. Ensure your warm milk is between 105-115°F (40-46°C); water that’s too hot will kill the yeast, and too cold won’t activate it. Also, check the expiration date on your yeast. If your kitchen is particularly cold, the dough might need more time to rise or a warmer spot. Make sure your bowl is covered to prevent a skin from forming, which can inhibit rising.
How do I get the perfect glaze consistency?
The key to perfect glaze consistency is gradual addition of liquid. Start with 2 tablespoons of milk or cream and mix thoroughly. If the glaze is too thick to drizzle, add additional milk or cream one teaspoon at a time, mixing well after each addition, until it reaches your desired pourable but not watery consistency. Remember, it will melt slightly when drizzled over a warm cake, so a slightly thicker glaze is often better to start with.