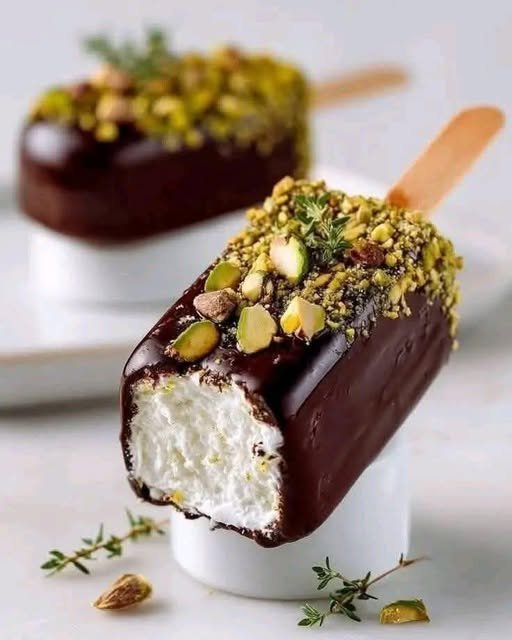
Homemade Chocolate-Covered Ice Cream Bars
Instructions
- Prepare the Ice Cream Base: Line an 8×8 inch (or similar size) baking pan with parchment paper, leaving an overhang on the sides to easily lift the ice cream later.
- In a large, very cold mixing bowl (you can chill it in the freezer for 10-15 minutes beforehand), add the cold heavy cream. Using an electric mixer (handheld or stand mixer with whisk attachment), beat the heavy cream on medium-high speed until stiff peaks form. Be careful not to overbeat, or it will turn grainy.
- In a separate bowl, combine the cold sweetened condensed milk, vanilla extract, and a pinch of salt. Stir until well combined.
- Gently fold about one-third of the whipped cream into the sweetened condensed milk mixture to lighten it. Then, gently fold in the remaining whipped cream until no streaks remain. Be careful not to deflate the whipped cream.
- Pour the ice cream mixture into the prepared pan, spreading it evenly with a spatula. Cover the pan tightly with plastic wrap and freeze for at least 4-6 hours, or preferably overnight, until very firm.
- Cut and Insert Sticks: Once the ice cream is solidly frozen, remove the pan from the freezer. Using the parchment paper overhang, lift the block of ice cream out onto a cutting board.
- Using a sharp, hot knife (dip it in hot water and wipe dry between cuts), cut the ice cream block into desired bar shapes. Typically, an 8×8 inch pan yields 8-10 bars.
- Quickly insert a wooden popsicle stick into the center of each ice cream bar. Place the bars back on the parchment-lined pan or a baking sheet and return them to the freezer for at least another 30-60 minutes to refreeze firmly. This is crucial to prevent melting during dipping.
- Prepare the Chocolate Coating: While the bars are refreezing, prepare your chocolate coating. Place the chopped dark chocolate and coconut oil in a microwave-safe bowl.
- Microwave on medium power in 30-second intervals, stirring well after each interval, until the chocolate is mostly melted and smooth. Alternatively, melt over a double boiler, stirring until smooth. Ensure no water gets into the chocolate. The coconut oil will help create a thinner, snappier coating.
- Pour the melted chocolate into a tall, narrow glass or measuring cup. This depth will allow for full submersion of the ice cream bars.
- Dip and Decorate: Working quickly, remove a few frozen ice cream bars from the freezer at a time. Hold a bar by its stick and quickly dip it into the melted chocolate, submerging it completely.
- Lift the bar out, allowing excess chocolate to drip off back into the glass. If desired, immediately sprinkle the chopped pistachios (or other toppings) onto the wet chocolate coating. The chocolate will set very quickly due to the cold ice cream.
- Place the dipped and decorated bar onto a clean parchment-lined baking sheet. Repeat with the remaining bars, returning them to the freezer as soon as they are dipped and decorated. If your chocolate starts to thicken, gently rewarm it for a few seconds in the microwave or over the double boiler.
- Final Freeze: Once all bars are dipped and decorated, return the baking sheet to the freezer for at least another 30 minutes, or until the chocolate coating is completely firm.
- Serve immediately or store for later enjoyment.
Cooking Tips and Variations
Use High-Quality Ingredients: The quality of your chocolate and ice cream base ingredients will directly impact the final taste. Opt for good quality dark chocolate with a cacao percentage between 60-70% for a rich, balanced flavor. For the ice cream, choose fresh, full-fat heavy cream.
No-Churn Ice Cream Tips: Ensure your heavy cream is very cold before whipping. Chilling your mixing bowl and whisk attachment for 10-15 minutes in the freezer can also help achieve stiffer peaks faster. Be gentle when folding in the sweetened condensed milk to maintain the airy texture of the whipped cream.
For a Custard-Based Ice Cream: If you have an ice cream maker and prefer a richer, denser ice cream, you can use your favorite vanilla or chocolate custard base recipe. Just make sure it’s fully churned and frozen solid before cutting and dipping.
Achieving the Perfect Chocolate Shell: The coconut oil is key here. It thins the chocolate, making it easier to dip, and helps it set quickly and with a satisfying snap. Make sure your chocolate isn’t too hot, as this can melt the ice cream too quickly. Aim for a temperature around 90-95°F (32-35°C).
Dipping Technique: Work quickly! The colder your ice cream bars are, the less they will melt during dipping, ensuring a smooth, even coating. A tall, narrow container for the melted chocolate minimizes waste and allows for a full, even dip. Tilt the container slightly if needed.
Preventing Chocolate Cracking: Cracking often occurs if the chocolate is too thick or if there’s a significant temperature shock. The coconut oil helps prevent this. Also, ensure your chocolate isn’t too cold when dipping; it should be fluid but not hot.
Flavor Variations for the Ice Cream:
- Chocolate Ice Cream: Whisk 1/2 cup (50g) unsweetened cocoa powder into the sweetened condensed milk mixture before folding in the whipped cream.
- Coffee Ice Cream: Dissolve 2 tablespoons instant espresso powder in 1 tablespoon hot water, let cool, then add to the sweetened condensed milk mixture.
- Mint Chip: Add 1/2 teaspoon peppermint extract and a few drops of green food coloring (optional) to the vanilla ice cream base, and fold in 1/2 cup mini chocolate chips before freezing.
Topping Variations:
- Nutty: Chopped almonds, walnuts, pecans, or hazelnuts. Toast them lightly for enhanced flavor.
- Crunchy: Crushed pretzels, cookie crumbs (Oreos, graham crackers), rice crisps.
- Sweet & Salty: A sprinkle of flaky sea salt over the chocolate.
- Sprinkles: For a festive look, use colorful sprinkles.
- Dried Fruit: Finely chopped dried cranberries or cherries.
Garnish with Fresh Herbs: As seen in some gourmet presentations, a small sprig of fresh thyme or rosemary can add an unexpected aromatic touch when serving, though it’s not meant for consumption with the bar itself.
Storage and Reheating
Homemade chocolate-covered ice cream bars are best enjoyed within a few weeks of making them, though they can last longer. Once the chocolate coating is completely set, transfer the bars to an airtight freezer-safe container. To prevent them from sticking together, you can wrap each bar individually in parchment paper or place a piece of parchment paper between layers.
Store the container in the coldest part of your freezer. When ready to enjoy, simply remove a bar from the freezer and eat immediately. There is no reheating required or recommended for ice cream bars; they are meant to be a frozen treat.
Frequently Asked Questions
Can I make these bars dairy-free or vegan?
Yes, absolutely! For a dairy-free ice cream base, you can use full-fat canned coconut milk (chilled overnight, use only the thick cream part) whipped with a dairy-free sweetened condensed milk alternative. For the chocolate coating, ensure you use a good quality dairy-free dark chocolate. The coconut oil is already vegan.
Why is my chocolate coating cracking?
Chocolate cracking can happen for a few reasons. Often, it’s because the chocolate is too thick or too cold when you dip the bar, causing it to seize up and crack from the temperature shock. Ensure your melted chocolate is at the right consistency (thinned with coconut oil) and not overly cold. Also, ensure your ice cream bars are thoroughly frozen before dipping to keep them from melting and causing uneven coating.
How can I prevent the ice cream from melting too fast during dipping?
The key is to work quickly and ensure your ice cream bars are as frozen solid as possible. After cutting and inserting sticks, give them another 30-60 minutes in the freezer. When dipping, take out only a few bars at a time, dip them swiftly, and immediately return them to the freezer. A deep, narrow container for the chocolate also helps by allowing a quick, full submersion.
What if I don’t have a specific pan size?
The pan size isn’t critical, but it will affect the thickness and number of your bars. An 8×8 inch pan yields thicker bars, while a 9×13 inch pan would result in thinner bars. You can adjust the cutting to achieve your desired bar size. Just ensure whatever pan you use, it’s lined with parchment paper for easy removal.